Understanding Concrete Screeding and Placing Techniques
Concrete flooring is a fundamental aspect of construction, ensuring durability, functionality, and aesthetics. Proper screeding and placing techniques are critical in achieving smooth, level, and long-lasting concrete surfaces. Whether working on residential patios, commercial floors, or industrial-grade slabs, mastering these techniques is key to a successful project.
What is Concrete Placing?
Concrete placing refers to the process of delivering freshly mixed concrete into its designated formwork or slab area. Proper placing techniques ensure even distribution, reduce segregation, and maintain consistent thickness throughout the structure.
Best Practices for Placing Concrete
- Surface Preparation: Ensure the subgrade is well-compacted, levelled, and free of debris. This prevents uneven settling and cracks.
- Recommended Product: Our range of Masterpac Plate Compactors, Rammers and Rollers ensures optimal soil compaction for a stable foundation.
- Steady Pouring: Consistent, controlled pouring prevents cold joints and weak spots.
- Recommended Product: Our Concrete Vibrator Pokers help manage steady concrete placement and compaction.
- Uniform Distribution: Use a Texas placer rakes to spread concrete evenly, ensuring it fills corners and edges without trapping air pockets.
- Recommended Product: Betonelli Bull Floats and Betonelli Hand Tools ensure even distribution and smooth transitions.
- Avoid Overworking: Excessive trowelling or reworking can cause water to rise to the surface, weakening the slab.
- Recommended Product: Our Betonelli Power Trowels provide precision finishing without overworking the surface. – We also do training on power trowelling.
- Compaction: Utilize vibrating tools to remove trapped air and ensure a dense, strong concrete structure.
- Recommended Product: Betonelli or Masterpac vibration Pokers
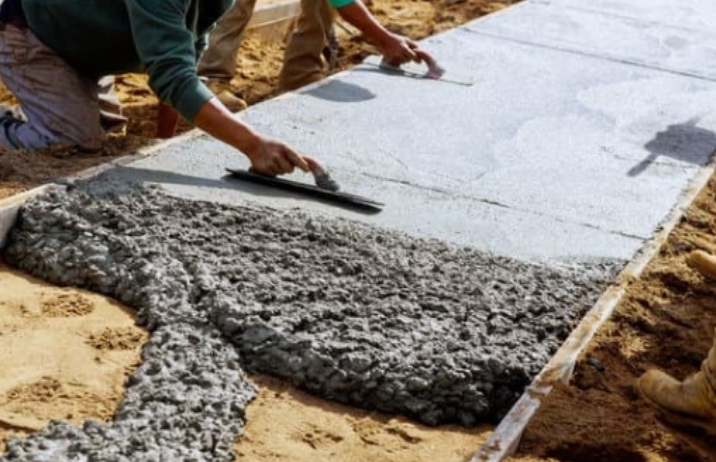
What is Concrete Screeding?
Screeding is the process of levelling freshly placed concrete to achieve a smooth, even surface. This step is essential to maintaining consistent thickness and preparing the surface for finishing operations.
Essential Tools for Screeding
- Straightedge Screeds: Wooden or aluminium screeds used manually for smaller areas.
- Recommended Product: Our Betonelli Screed Clamed Handle (Comes in various sizes) offer durability and precision for small projects.
- Bull Floats: Used to smooth the surface and push larger aggregates below, improving finish ability.
- Recommended Product: Betonelli Bull Floats designed for superior finishing control.
- Laser Screeds: Advanced technology for high-precision, efficient levelling in large-scale projects.
- Recommended Product: Ligchine Laser Screeds for high-tolerance industrial flooring applications.
Step-by-Step Screeding and Placing Process
Step 1: Site Preparation
- Ensure formwork is correctly installed and secured.
- Compact the base layer and set screed rails for level guidance.
- If necessary, apply bonding agents or moisture barriers for enhanced adhesion.
Step 2: Placing the Concrete
- Begin pouring at one end and work systematically.
- Spread the concrete evenly, avoiding excessive accumulation in one spot.
- Use Betonelli placer rakes, or a laser screed to distribute the mix uniformly.
Step 3: Screeding the Concrete
- Place the screed tool across the formwork or guides.
- Use a sawing or pulling motion to level the concrete evenly.
- Work in small sections to maintain consistency and accuracy.
Step 4: Addressing Low Spots
- Identify dips or uneven areas and add fresh concrete as needed.
- Re-screed to ensure a level finish.
Step 5: Finishing with a Bull Float
- Immediately after screeding, use a bull float to refine the surface.
- Push larger aggregates below and close gaps left by the screed.
- Allow the slab to set before additional finishing operations.
Tips for Achieving a Perfect Concrete Surface
- Work Efficiently: Concrete sets quickly, so screeding should commence immediately after placing.
- Monitor Surface Moisture: Overwatering or rapid drying can cause defects.
- Use Proper Lighting: Good visibility helps spot inconsistencies in surface levelling.
- Maintain Your Tools: Clean, well-maintained equipment ensures precision and efficiency.
Advanced Screeding Techniques
Vibrating Screeds for Improved Compaction
For large-scale projects, vibrating screeds provide multiple benefits:
- Enhances compaction, reducing voids and weak points.
- Speeds up the process while ensuring uniform consistency.
- Minimizes manual effort, improving efficiency and accuracy.
Laser Screeding for Precision Floors
Laser screeds offer state-of-the-art levelling:
- Ensures high accuracy for industrial and commercial floors.
- Reduces labour and enhances productivity.
- Ideal for high-tolerance flooring in warehouses, factories, and large facilities.
Why Proper Techniques Matter
Inadequate screeding and placing methods can lead to structural weaknesses, surface defects, and costly repairs. Using the right techniques guarantees:
- A stronger, more durable slab with fewer cracks.
- A smoother, more aesthetic finish.
- Reduced material waste and increased efficiency.